About RadBounce
RadBounce - Downloader Companion is software available for use with the DVMI Downloader. Once configured, all downloaded images become available automatically in any compatible viewing software. We have configuration instructions for the following companion software programs.
Known Companion Software
Check your RadBounce Version
If you already have RadBounce installed with a version lower than 23.1, you will need to uninstall that version before installing the new version.
To check the version of RadBounce installed,
1. Open RadBounce from the Hidden Icons taskbar menu.

2. The version is displayed in the heading of the RadBounce program.

Uninstalling RadBounce
Uninstalling a Windows program depends on the version of Windows you are using.
- Search “uninstall” from the Windows Start menu or navigate to the Programs or Apps menu.
- Select RadBounce Downloader Companion from the list of Programs or Apps.
- Select the Uninstall button under the selected program or app.
Installing RadBounce
1. From your account on dvminsight.com, select RAD Bounce - Downloader Companion from the Downloads menu.
2. If prompted, click Open then click Install.
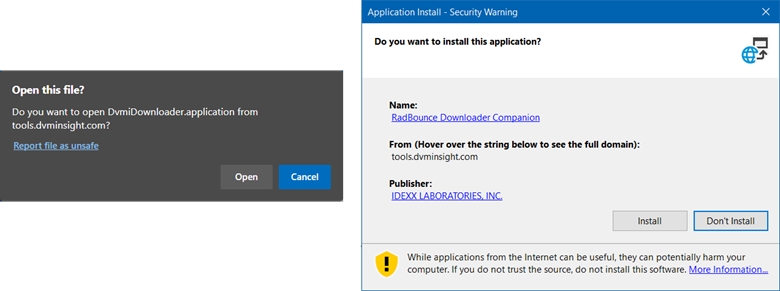
3. Once installed, the RadBounce program will open. In the future, RadBounce will launch automatically upon computer start up and minimize to the Hidden Icons taskbar menu similar to the DVMI Downloader.

Configuring RadBounce
Once you have installed RadBounce and obtained the viewer AE Title and Port from the Companion Software, you will need to configure RadBounce to communicate with the viewer. Instructions on where to find the Companion Software or viewer AE Title and Port are available within this knowledge article.
In addition, some viewers like ClearCanvas and eFilm, have to recognize the server it is receiving images from. To identify RadBounce as a sender, you will need to add the Out Going AE Title to the viewer as a server destination. Make note of the Out Going AE Title of RadBounce in step 2 below (default Out Going AE Title is DVMRadList).
1. With RadBounce open, select Options from the Tools menu.
2. In the Options window, enter the DICOM Destination or the companion software or viewer AE Title and Port. See below for software-specific instructions on where to find this information.
- If using eFilm or ClearCanvas, the IP Address can remain as default 127.0.0.1.
- If using RadiAnt, change the IP Address to your computer or system name. You can find this in the Windows System Information or in RadBounce.

3. Click Export Settings to save any changes made to the RadBounce options.
4. Click OK to close the Options window.
To test the RadBounce configuration,
1. Click on Dicom ECHO.
2. A "Echo complete with status" line will appear in the log with a Failed or Success message.

ClearCanvas and RadBounce
Important Note: ClearCanvas products reached an End of Life in 2020 but we understand some people may choose to continue to use it. Click here for more information about the ClearCanvas – End-of-Life Notice.
When configuring RadBounce for ClearCanvas you will need to know the AE Title and Port of the ClearCanvas system. This information will need to match the DICOM Destination information in RadBounce.
Finding the AE Title and Port in ClearCanvas
1. Launch ClearCanvas and go to Tools > Options > DICOM Server,
2. Copy or note the AE Title and Port from this location. You will need to enter the information in the DICOM Destination when configuring RadBounce.
3. ClearCanvas has to recognize the server that it is receiving images from. To identify RadBounce as a sender, you will need to add a new server destination in ClearCanvas. Continue to the adding a server destination in ClearCanvas instruction.
Adding a Server Destination in ClearCanvas
1. In the Explorer window, under the DICOM tab, highlight My Servers then click the Add Server icon.
2. Enter the information to set up a new server destination,
DVMInsight Server Name: RAD_BOUNCE
Host: 127.0.0.1
Location: RAD_BOUNCE
AE Title: Enter the Out Going AE Title in RadBounce found in Tools > Options. The default Out Going AE Title is DVMRadList.
Port: The Port should differ from the Port in the ClearCanvas DICOM Server Settings and RadBounce. If there is another server destination already in ClearCanvas, use a different Port from that as well. The most commonly used Ports are 104, 108, and 4006 but it doesn't matter what you use as long as it is different.
3. Click OK and verify the server is listed on the Explorer tab.
4. Continue with Configuring RadBounce.
eFilm and RadBounce
When configuring RadBounce for eFilm you will need to know the AE Title and Port of the eFilm system. This information will need to match the DICOM Destination information in RadBounce.
Finding the AE Title and Port in eFilm
1. Launch eFilm and go to Utility > Process Manager > Settings.
2. Copy or note the AE Title and Port from this location. You will need to enter the information in the DICOM Destination when configuring RadBounce.
3. eFilm has to recognize the server that it is receiving images from. To identify RadBounce as a sender, you will need to add RadBounce as a new server destination in eFilm. Continue to the adding a server destination in eFilm instruction.
Adding a Server Destination in eFilm
1. Navigate to Edit > Properties > Remote Devices tab.
2. Enter the following information to set up a new server destination,
Description: RAD_BOUNCE
DVMInsight AE Title: DVMRadList
IP Address: 127.0.0.1
Port: The Port should differ from the Port in the eFilm Process Manager Settings and RadBounce. If there is another server destination already in eFilm, use a different Port
from that as well. The most commonly used Ports are 104, 108, and 4006.
3. Click Add, then click OK
4. Continue with Configuring RadBounce.
RadiAnt and RadBounce
When configuring RadBounce for RadiAnt you will need to know the AE Title, Port and your Computer name. This information will need to match the DICOM Destination information in RadBounce.
Finding the AE Title and Port in RadiAnt
1. Click the Search & download studies from PACS icon. You may be prompted to configure PACS locations, click Yes. Refer to the RadiAnt manual for additional information.
2. Click the options icon or use the keyboard shortcut CTRL+O.
3. Copy or note the AE Title (My AE title) and Port (Listener port) from this location. You will need to enter the information in the DICOM Destination when configuring RadBounce.
Note for those using or plan to use Query/Retrieve (QR): We recommend changing the AE Title to something unique to prevent issues when using Query/Retrieve (QR).
3. RadiAnt has to recognize the server that it is receiving images from. To identify RadBounce as a sender, you will need to add RadBounce as a new server destination in RadiAnt. Continue to the adding a server destination in RadiAnt instruction.
Adding a Server Destination in RadiAnt
Before proceeding, you will need your computer or system name. You can find this in the Windows System Information or in RadBounce.
1. In RadiAnt, click the Search & download studies from PACS icon.
2. Click the options icon or use the keyboard shortcut CTRL+O.
3. Complete the following fields at the bottom of the window,
IP address: Enter your computer or system name.
Port: Enter 104, or any other DICOM port such as 11112, 4000, 4001
AE title: Match the Out Going AE Title in RadBounce (default Out Going AE Title is DVMRadList)
Description: Enter an identifying description, such as RadBounce
4. Click the green plus sign icon to add the destination then Save.
5. Continue with Configuring RadBounce.
DVMInsight Learning
Comments